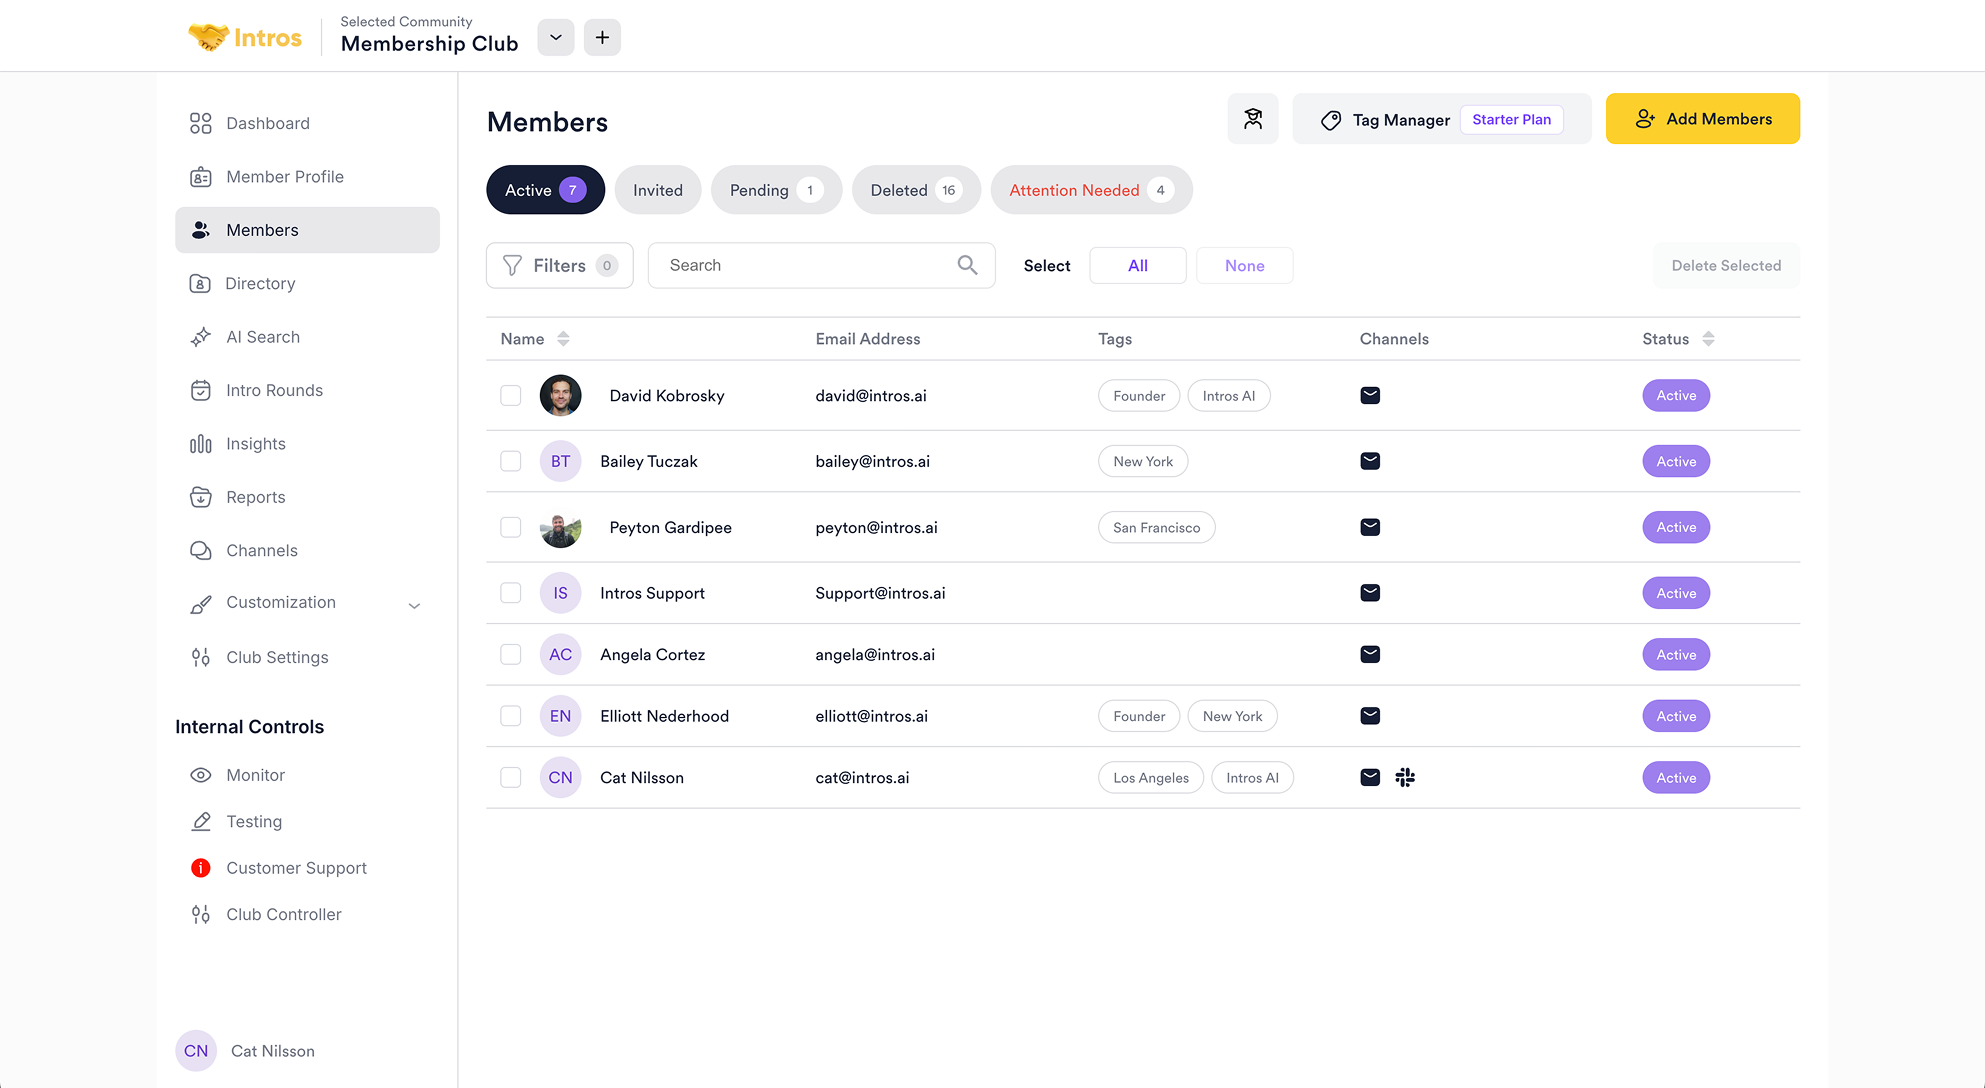
Utilizing Tags
Within the Members page, you can create Tags to identify and group certain members of your community.Creating a Tag
For example, if you wanted to view all of the Founders in your community as a group by location, you could create Tags for “Founder”, as well as all major cities in the US, as shown below.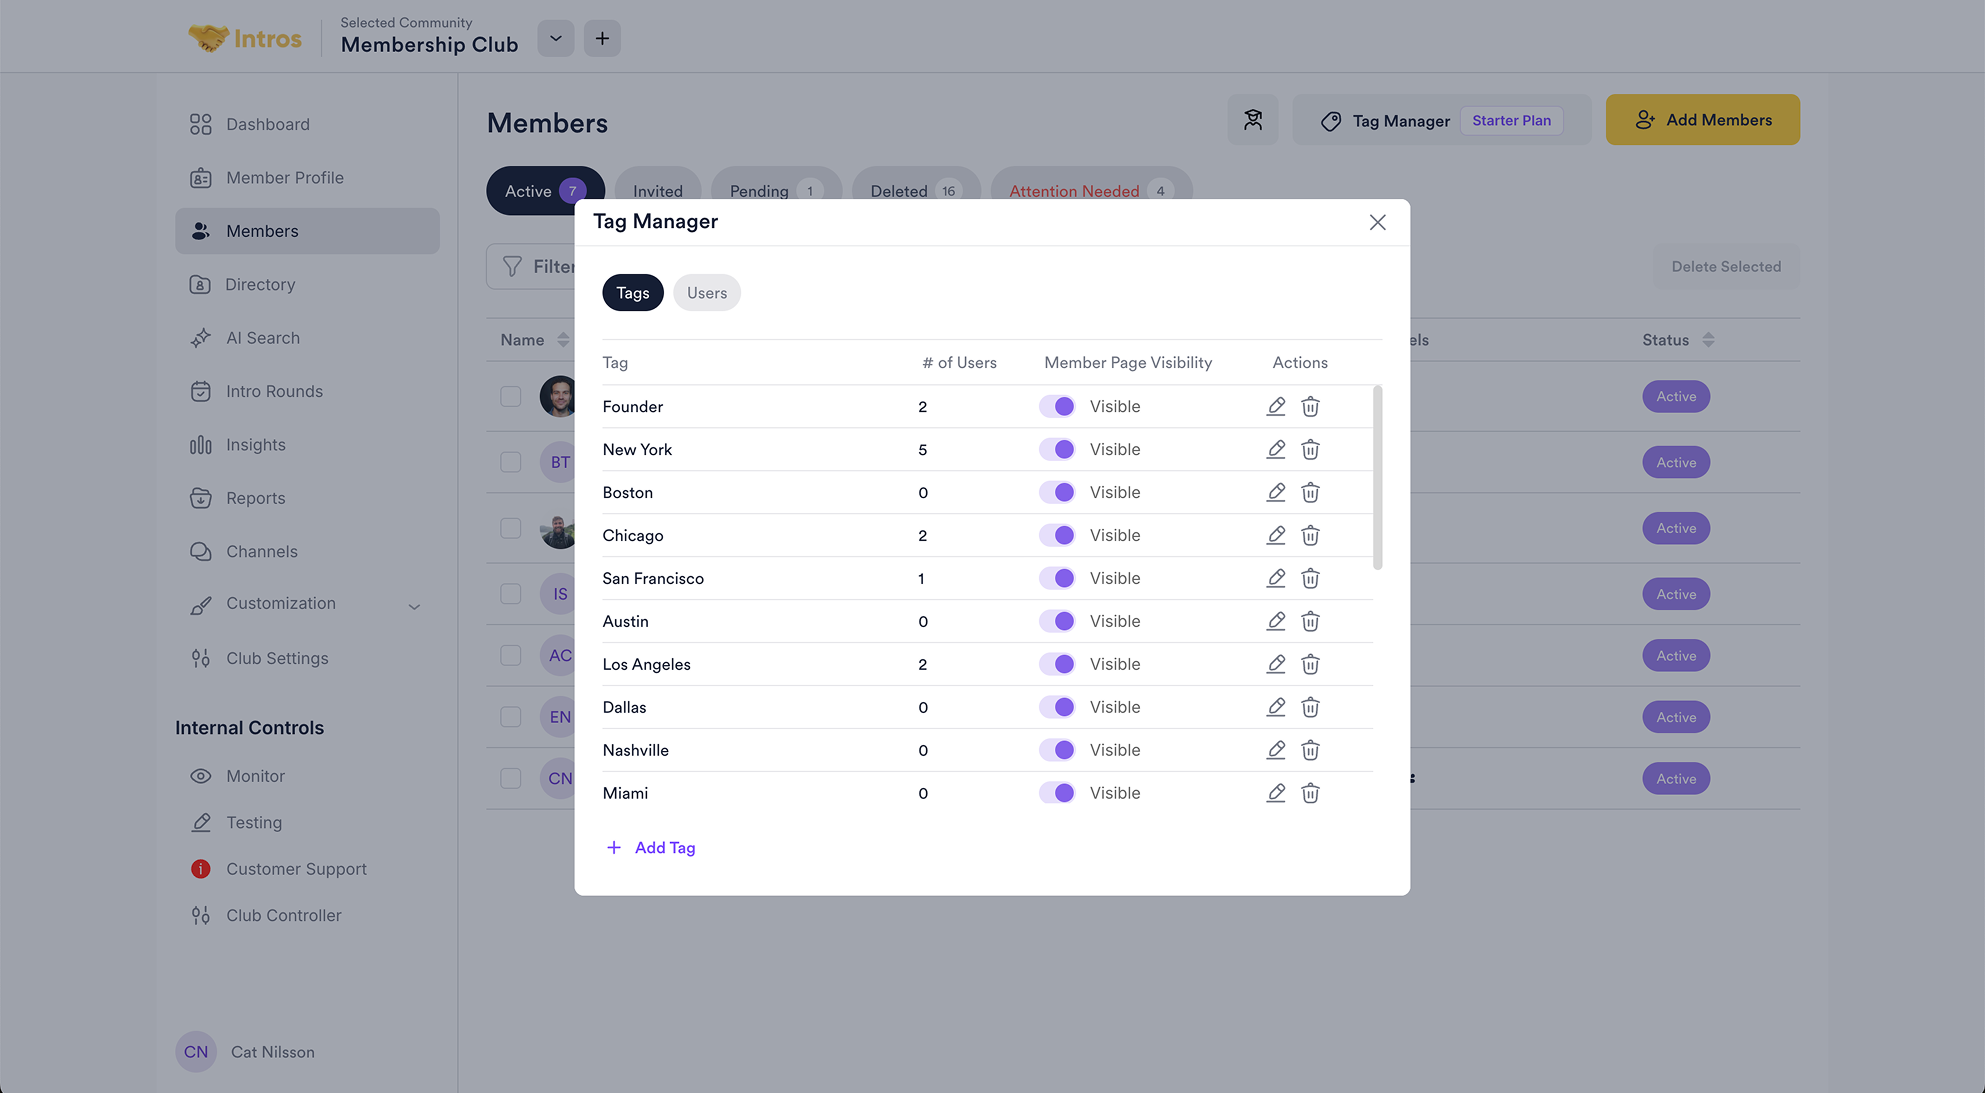

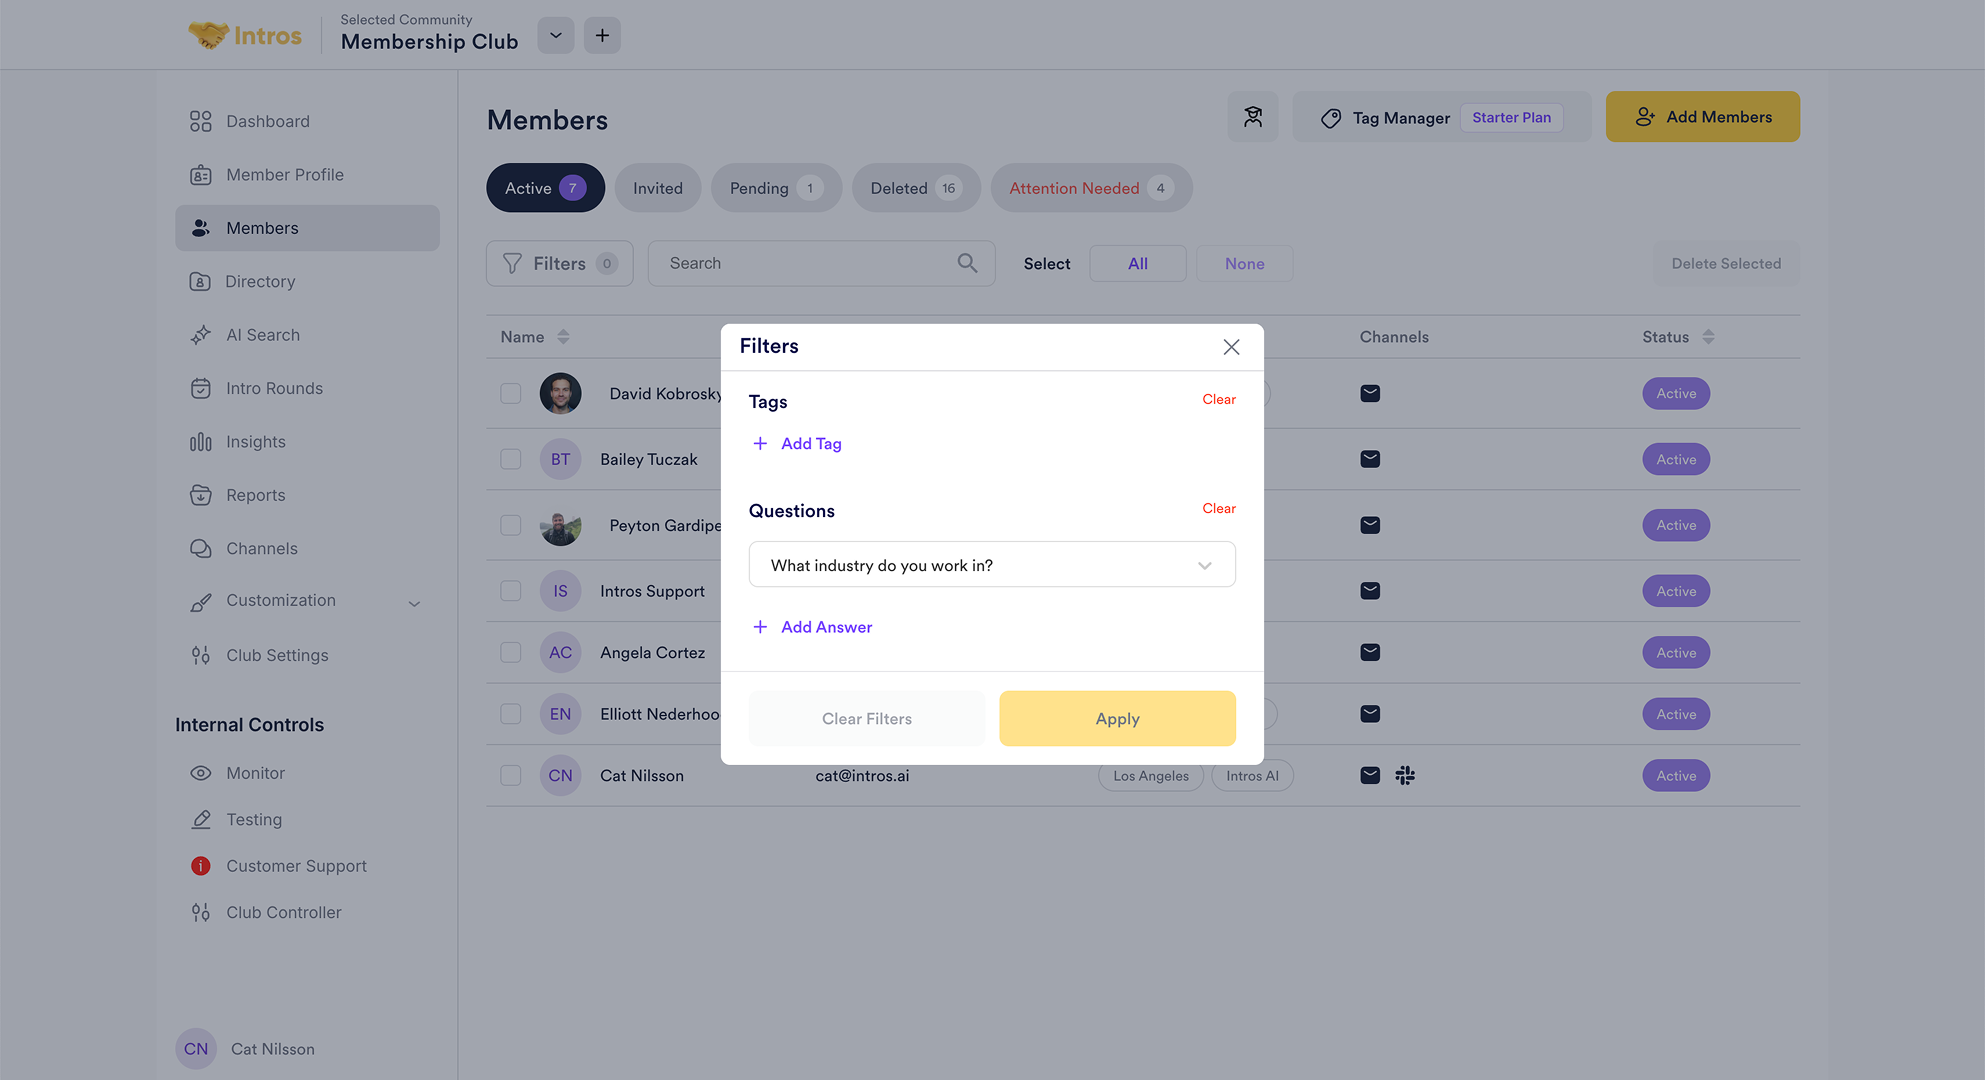
Utilizing Filters
You can use the “Filters” tab to sort members by Tags and Questions.
- Questions
For example, you could use the tags “Founder” and “New York” to search for founders in your community who live in New York.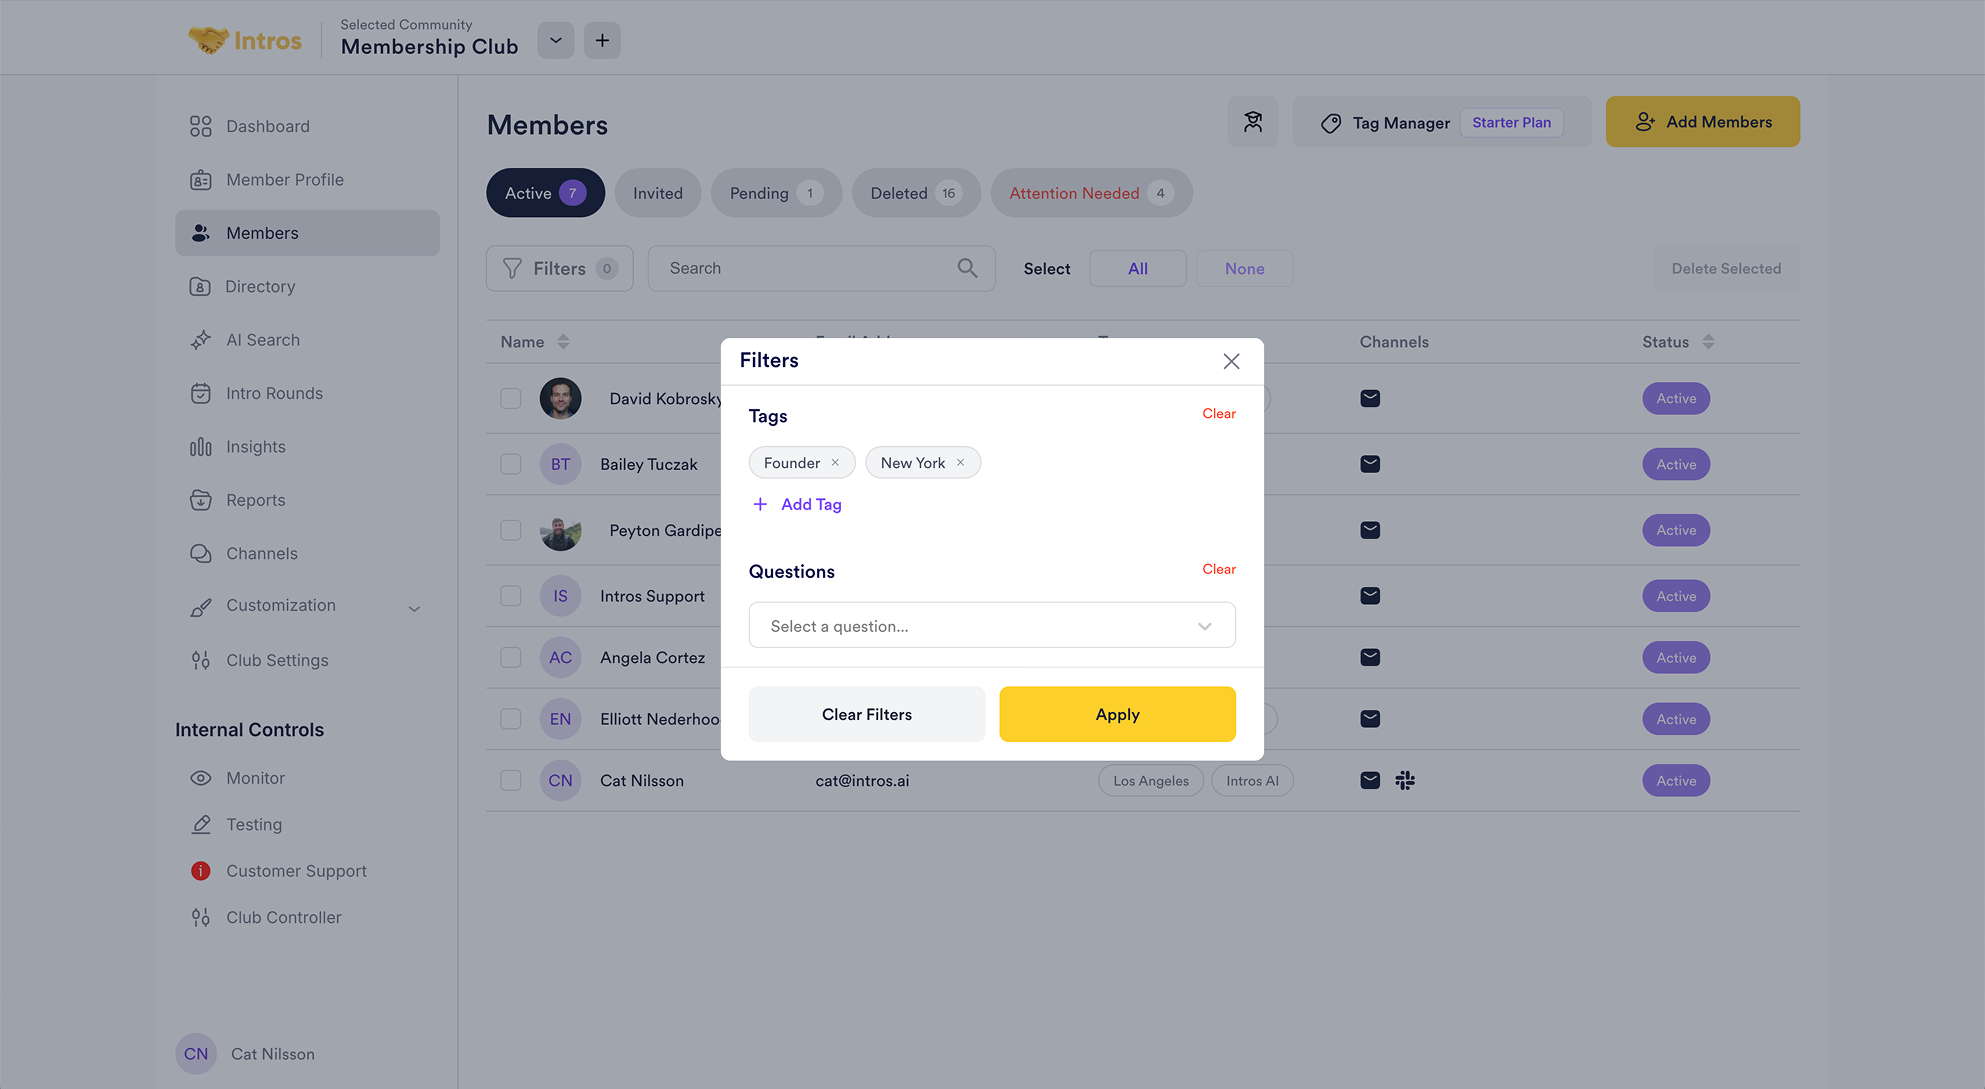
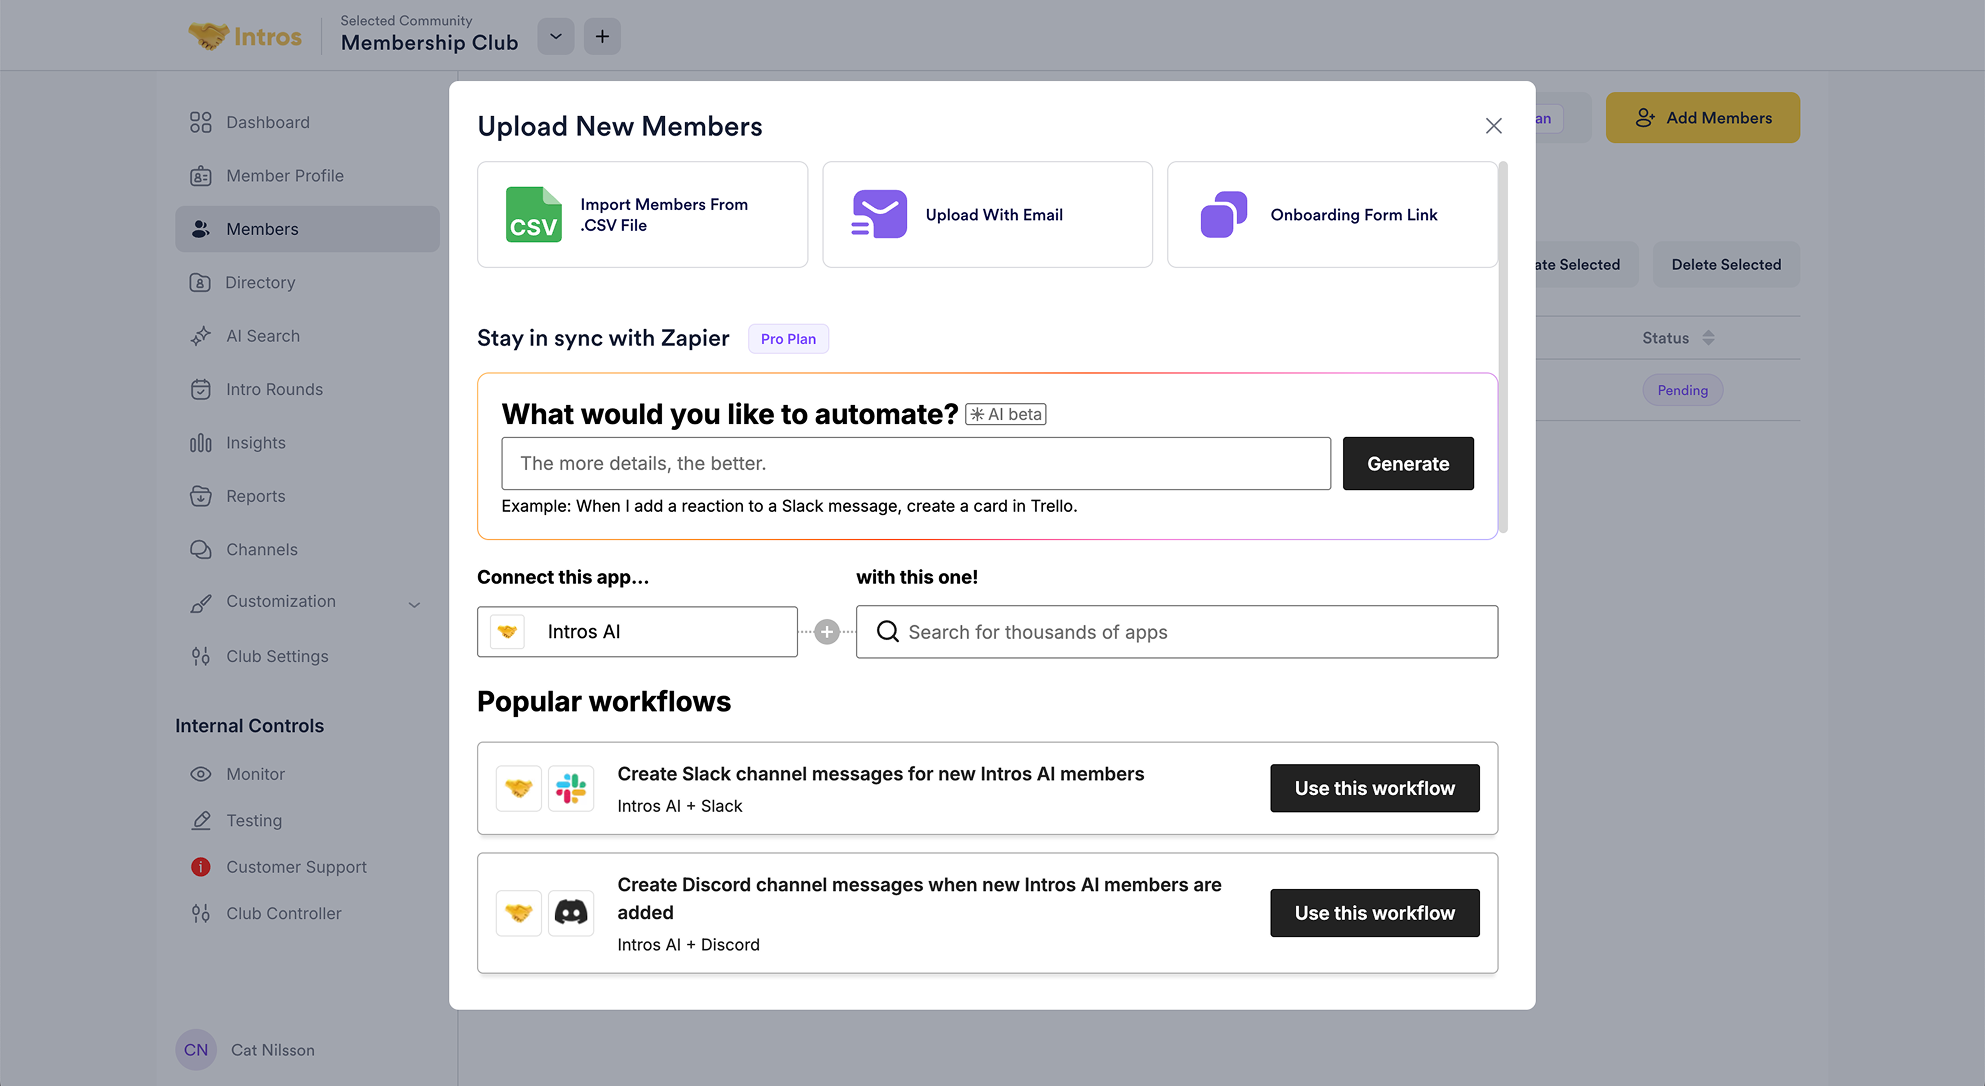
Adding Members
View our interactive demo below!There are four main methods for adding new members to your community: uploading existing member data, sending direct invitations, using an Onboarding Form Link when no data is available, or integrating member data from another product.
Uploading Member Data
Before inviting or activating your members, it’s important to upload any existing member data (such as emails and names) via CSV if you have it. This ensures that the platform has all necessary information on your members.
Access the Add Members Button
Access the Add Members Button
Upload the CSV File
Upload the CSV File
Choose the CSV file from your computer that contains the member data to upload it directly into the platform.
Map Data Types
Map Data Types
Standard Fields: Map each CSV column to the corresponding Intros Profiles data type (e.g., first/last name, email, phone number, etc.).Custom Fields: Create custom free-text fields during the mapping process if your CSV contains data that doesn’t fit the standard fields. This allows you to capture specialized information that’s important to your community.
Preview and Confirm
Preview and Confirm
Preview the profiles to ensure all the data is mapped and displayed correctly, including any custom fields.
Manage Uploaded Members
Manage Uploaded Members
Activate Without Invitation: You can upload members without sending an invitation. These members will be added to the Pending tab, where you can manually activate them by directly selecting individuals or “All” and then clicking “Activate Selected”.Invite After Upload: If you want to send out invitations after uploading, proceed to the next steps.
Inviting Members via Email
If you don’t have pre-existing data, you can alternatively invite members via email.
Access the Add Members Button
Access the Add Members Button
Invite with Email
Invite with Email
Enter each member’s email address individually, pressing enter after each one, or select multiple emails at a time to send a direct invitation.You can also select “All” in the Pending tab and click “Invite Selected”.
Customize your Invitation Method
Customize your Invitation Method
You have the option the customize the invitation to join by editing the template before sending it out to your members.
Adding Members through an Onboarding Link
If you prefer a simple and direct approach, and you don’t have any member data, you can instead add members by sharing an onboarding link. This method allows members to join the community by accessing the form directly, without needing to accept an email invitation.
Customize the Onboarding Form
Customize the Onboarding Form
Before sending out the link, you can customize the onboarding form to best fit your community’s needs, which you can do in the Member Profile and Customization tabs.There are five different types of questions you can create to gather the most relevant information from your members:
- Free Response: Allows members to provide detailed answers in their own words.
- Single Select: Offers a list of options where members can choose only one response.
- Multi Select: Allows members to select multiple options from a list.
- Custom Scale: A Likert scale with custom values (e.g., “How many years of experience do you have?”). Custom scale questions must have 5 values.
- Two Part Multi: Give & take style questions consisting of two related questions that share a similar answer bank. For example, “Where could you use support?” and “How can you support others?”
Copy the Onboarding Form Link
Copy the Onboarding Form Link
Navigate to the “Add Members” button.Copy the Onboarding Form Link and share it with your members via iMessage, WhatsApp, Slack, or any other platform.
Preview the Onboarding Form
Preview the Onboarding Form
Paste the link into a new browser tab to preview the member’s onboarding experience.This preview allows you to understand the flow from a member’s perspective.
Adding Members through Zapier
If you want to automate the process of adding members from other platforms, such as Airtable, Hubspot, Circle, Google Sheets, etc. you can use Zapier to create a seamless integration. Though this method may require a bit more setup, it is definitely worth it.
Login to Zapier
Login to Zapier
If you don’t already have a Zapier account:Sign up for a free account at zapier.com.Follow the instructions to set up your account and familiarize yourself with the platform.
Set Up a New Zap
Set Up a New Zap
A Zap is a workflow that connects two or more apps to automate tasks. In this case, you’ll connect Circle to Intros AI.To create a new Zap:In the Zapier dashboard, you’ll see a search bar under the question, “What would you like to automate?”Type in “When a new member is added in Circle, create a member in Intros AI” to find relevant pre-built Zaps or to start building your own.You can either click the purple “Try it” button next to a suggested Zap, or you can click ”+ Create” in the top left hand corner of the screen to start from scratch.
Set Up the Trigger
Set Up the Trigger
Once you’re inside the Zap builder, you’ll start by setting up a Trigger—this is what kicks off the automation.Choose Circle as the app, and for the trigger event, select New Member Added (or a similar option).Connect your Circle account by signing in and authenticating your credentials.
Set Up the Action
Set Up the Action
Next, you’ll need to set up the Action that Zapier should take whenever the Trigger happens.Choose Intros AI as the action app, and select an event like Create Member.Connect your Intros AI account in the same way you did for Circle.
Test Your Zap
Test Your Zap
Once both the Trigger and Action are set up, Zapier will prompt you to run a test to ensure everything is working correctly.This step is crucial for making sure new members added in Circle are automatically added to Intros AI.
Activate Your Zap
Activate Your Zap
After confirming that your test is successful, you can activate the Zap.From now on, any new member added to Circle will automatically be created in Intros AI without manual intervention.
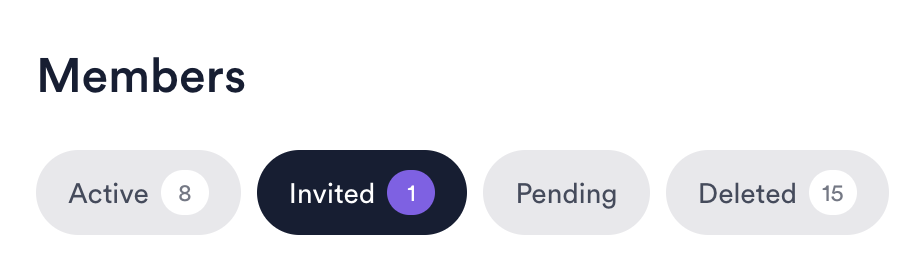
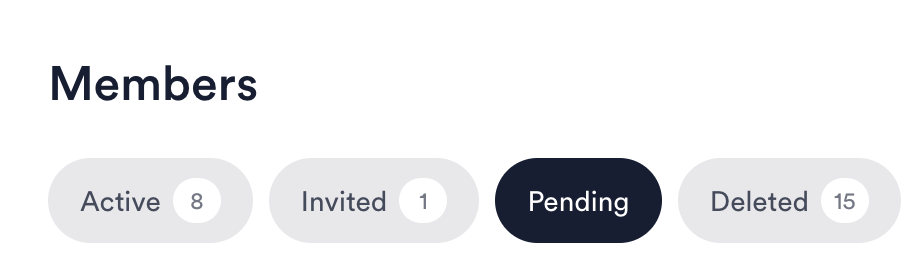
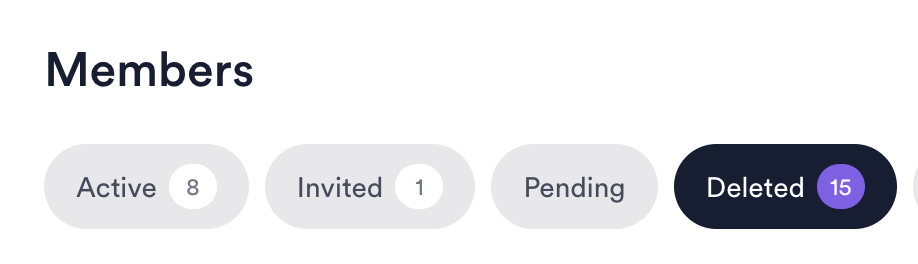
Viewing Members
Additionally, you can toggle through different filters or use the search function to find specific members of your community. As shown below, you can sort members by Active, Invited, Pending, and Deleted.- Active
- Invited
- Pending
- Deleted
In the “Active” tab, you will see all members who have been activated or accepted an invitation to join your community.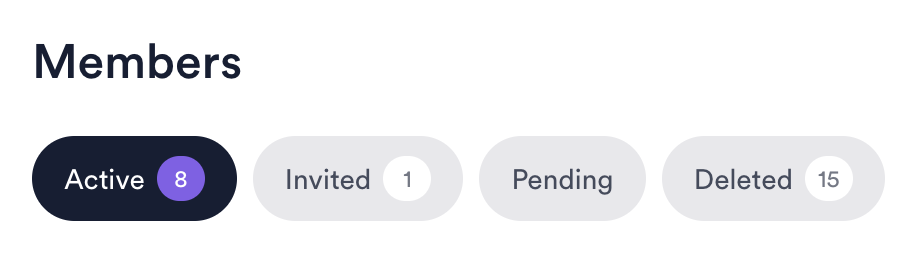
Members FAQs
- Question: “How is personal information / data for members entered into the platform?”
- Answer: “There are multiple ways:
- Members can enter their own information through the Onboarding Form, Email Invite, or Member Profile.
- Admins can upload a CSV file to input member data.”
- Answer: “There are multiple ways:
- Question: “Can members be segmented?”
- Answer: “Yes, you can create tags on the Members page by clicking on the ‘Tag Manager’ and adding tags to segment members.”
- Question: “Is it possible to edit members once they’ve already joined the club?”
- Answer: “Admins can manage tags and delete members, but cannot edit core member information. Members, however, can edit their own information.”
- Question: “Can we ‘mass delete’ or ‘select all’ to make mass changes to all members?”
- Answer: “Yes, we do offer the ‘select all’ functionality. While you are able to delete members, this only switches them to inactive. To permanently delete members, please reach out to us.”
- Question: “I have inactive users, but I don’t have any record of them requesting me to be removed from intros. Can they ‘unsubscribe’ themselves?”
- Answer: “Yes, members are able to unsubscribe themselves by pressing the unsubscribe in the bottom of opt-in emails.”
- Question: “If we activate all members, will we still be able to retroactively invite them?”
- Answer: “We typically don’t do this, but it is feasible. After you activate members, we can inactivate them again and then invite them…so while it’s a bit hacky, it is doable.”
- Question: “If I provide you with a CSV of all the fields we would want to map to Intros, is there an easier way to map to the questions than just manually creating custom questions and adding all the options for multi-select?”
- Answer: “Yes, we can just create a new custom field at the time of mapping (without the need to create additional custom questions beforehand).”
- Question: “Why did I get an Attention Needed warning when inviting new members?”
- Answer: “The Attention Needed warning usually occurs due to a problem delivering an email. This can happen due to incorrect email addresses, network issues, or security filters. Go to the Members page, select ‘Attention Needed,’ and correct or confirm the email.”
- Question: “Is there a way to make the onboarding link private with a password? That way we can send out the onboarding link but still have it protected.”
- Answer: “Unfortunately, this isn’t a feature we have built into the product, but you can toggle on ‘manually approve’ Members in the Club Settings so that no one gets access without you approving them first. Approving them can be done in the Pending tab on the Members page.”
- Question: “Do you offer data enrichment options?”
- Answer: “Yes, we partner with a tool called Clay to do this, particularly using member’s LinkedIn profiles. When we enrich data, we can basically go as deep as we’d like. I’d say standard enrichment includes: Name, Job Title, Company, LinkedIn Headline, LinkedIn Bio, Location, Education, Industry, and Company Description. There are a ton more options for what we can enrich as well, so happy to customize this to your liking.”